Check out this collection of basic combat tips for the Oak & Iron game. We cover a wide variety of content that every new and veteran player of the game. These suggestions will help you navigate the waters and avoid some “gotchas” in the game. Once you’re done here, check out our more advanced combat guides on specific topics like Deployment and Fire Ships.
General combat tips:
- Fatigue will make or break your success more than the hull of your ship. Rally early and rally often. Fatigue causes you to will lose dice on your attacks and makes you less effective at sinking opponents.
- Concentrate fire. It is tempting to spread fire and trade fire one for one in a fleet. DON’T. Fire your shots from multiple ships at 1 or 2 ships until they are Crippled or Shaken. Shoot a target A LOT, rather than being cautious.
– Captain Davey Bones
“Kill it till it’s dead”
- Seamanship and Crew actions allow speed adjustments. Don’t be afraid to do BOTH in a round if needed. Especially at the start of the game when closing with the enemy.
- When moving at “Full Sail” you cannot take a “Reload Action” (pg. 13). Remember to use a Crew action the round BEFORE getting into combat to slow down to “Battle Sail”.
- Ships can fire from BOTH sides in a single round. Many opponents forget this, so splitting their line and putting targets on both sides of your ship can result in you making a devastating surprise attack … or fail miserably and sets you up to be shot by both ships in return.
- You can only reload one side of your ship per round. Think about the round ahead and if you will have a better target in range.
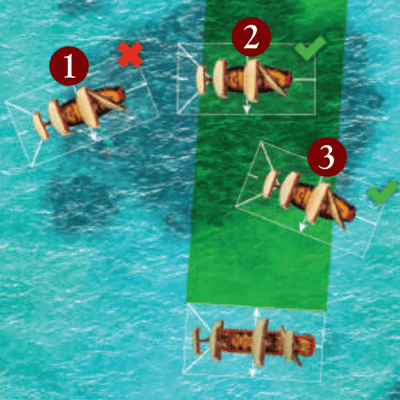
- Stay more than Yard Arm distance away from terrain to avoid a collision on a turn. It also prevents an opponent ramming you into an object causing damage, entanglement, or being Aground.
- The size of the ship doesn’t always reflect its value. Some opponents stack lots of upgrades on a single ship. Target it first. Taking out a single ship removes a large # of points in their force and swings things in your favor (e.g. removing a 32-point ship from a 50 pt game, deprives them of 64% of their force with one kill).
Preparing for Boarding
Pay attention to your opponent’s force list and what they have selected.
- If you know your opponent has ships that have Additional Crew and ship upgrades like Boarding Party, Buccaneers, Corsairs, Marines, or Swashbucklers, then you KNOW they are boarding. Expect that ship to move into yard arm distance of one of your vessels. Keep them at range if at all possible and make them waste the 2-8 points of their force’s upgrades.
- If your opponent is playing the Dutch or Pirates they are also likely to have a boarding-focused squadron. Be ready to avoid the boarding or board them before they can board you.
- Check out our full list of tips and tricks for Boarding here
If your Opponent has heavy, slow ships:
- Choose a deployment zone that puts them Windward or In the Wind’s Eye, it should be your top priority. Putting your opponent at a wind disadvantage gives them an even slower speed and stalls their movement giving you a HUGE tactical advantage. Stay upwind and pepper them with long-range shots to soften them up and inflict Fatigue before they can close.
- Consider taking shoals, particularly if you have a lighter fleet. Ships with a high Fortitude have heavy drafts and a higher probability of running aground. Draw your opponents towards shoals early and if you are bold, you can cut across them and force your opponent to follow or spend the time maneuvering around them.
- The opponent likely has High Freeboard or Very High Freeboard. Errata in the V1.01 of the rulebook allows a Raking Shot from the Stern to ignore those advantages. This is often best accomplished using two ships, and forcing them to turn to expose their flank while attacking one ship or the other.
- Avoid trading Broadsides. Move towards your enemy at harsh angles presenting as little of your ship towards the enemy as possible so they have less area available to get in their Broadside path.
- If you have Yare and you’re not going to be able to line up a shot anyway, turn hard and deny your opponent a shot in the current round even if it hurts movement next round.
- Speed is your ally. Use early-game Seamanship Actions to raise sails and build speed. Stay moving quickly in hopes of moving through their Broadside paths
- While trying to keep Formation, keep more than the length of a ship’s base between your ships. This forces your opponent to concentrate on one ship or the other for its Broadside path.
If your Opponent has multiple, light, fast ships:
- When selecting terrain in the pre-game, go for islands or landmasses. These features block line of sight and deny as many opportunities for ships with Small to keep you at long range.
- If you have larger ships, they are naturally slower. Use your early game Seamanship Actions to raise sails and build your base speed to try your best to keep up with them or keep them at bay if necessary.
- Consider targeting the opponent’s rigging rather than their hull to slow them down and deny them their speed advantages (pg 25).
- Expect them to board. IF at all possible force their closest ships to move before you do so you can dodge or Cut Free if necessary. If you know you are going to be boarded and can’t avoid it, board them first. Smaller ships have lighter crews and the negatives from Fatigue hurt more so if you damage them first they are less able to counterattack during their Close Combat attacks.
- Be wary of your enemy attempting to swarm you and board from multiple sides. Keeping your formations and ships closer together can deny your enemy access to multiple sides of the ship.
- Be wary of Raking shots. Multiple ships present more opportunities to line up dangerous shots.
- Hold your Formations as best you can to keep the advantage as long as you can.
- Concentrate fire because lighter ships are fragile and sink quickly.
Formation
- STAY IN FORMATION! This is one of the most powerful advantages you can get and it’s completely “FREE” for every ship in every faction.
Strike Points
If you are used to playing wargames, most of them focus on completely wiping out 100% of your opponent’s force. That’s not the case for Oak & Iron where victory is typically determined by Strike Points. As in real life, naval combat is about the survivability of ships. Admirals rarely fought to the death and sink all ships. Ships were expensive and valuable assets taking months or years to build. When things went poorly, it was better to flee with the remaining portion of the fleet rather than fight to the death. Additionally, the goal was to take the cargo or ship itself as a prize which is hard to do if the ship was at the bottom of the ocean.
Rules for Strike Points:
If a Squadron ever has more Strike Points than ships, that Squadron may Withdraw (pg. 23)- 1 for each ship that is Crippled (not Out of Action)
- 2 for each ship that has sunk, is captured, or Out of Action
3 for each Flagship that is Out of ActionRemoved in Errata v1.01- Objective cards may cause players to earn extra Strike Points
Strike Point Strategic Tips
- Think “Strike Points” rather than 100% wiping out your opponent. You don’t earn strike points for partially damaged ships or Shaken ships. You get 1 point for each Crippled ship and 2 for those Out of Action.
- Out of Action requires you to inflict 100% Fatigue AND 100% Damage on the ship. While that may sound harder than just Crippling a ship, it’s not that much more difficult.. Once a ship is Crippled, any additional Damage automatically reduces Fatigue, or if Shaken, any additional Fatigue auto inflicts Damage. This accelerates the Damage or Fatigue the ship receives over hitting a regular ship.
- Light and small ships are easier to sink. A Sloop and a 1st Rate ship are both worth the same number of strike points. Focusing on the smaller targets leads to easier Strike Points.
The Flagship is worth 2 Strike Points. Sinking it should be a high priority. Additionally, many players are tempted to stack the flagship with upgrades. This means sinking the flagship earlier will not only earn you the bone Strike Point, it will take out a larger point percentage of the opponent’s force.Removed in errata 1.01- Don’t forget you can recapture your own ships to take back Strike Points with boarding actions of your own.
- Focus on your mission objectives that offer Strike Points (if they exist).
- When building your force, more ships in your force means your opponent has to sink more to win.
- If you are low on ships, you can Capture enemy ships rather than sinking them to regain a few Strike Points.
Ramming
- Video games and Hollywood make the tactic of ramming seem glorious. In the Age of Sail, ramming was rarely a good thing. It resulted in just as much, if not more, damage to the rammer as the target.
- Ramming would risk dislodging the cannons, cargo, and gunpowder making a nasty mess and injuring the crew.
- The masts and rigging of the ships were larger and wider than the hull. This can cause a ship’s rigging to collide before the hulls made contact. This contact resulted in minimal if any damage to the hulls. This is represented in the game by potentially getting your ships Entangled.
- The bow is a point where all the support beams meet. Cracking the central beam/keel would be devastating and likely lead to you having to moor the ship for costly/time-consuming repairs. Or even worse, sinking yourself in the process of ramming an enemy.
- Realistically, ships are typically only sailing at speeds of 15-25mph (24-40kmh). While that will cause damage, it is more like a light fender bender in a residential zone than a high-speed collision on the highway.
- I think Firelock Games made the right decision in making ramming more of a penalty to the rammer than the target. It avoids turning the game into a demolition derby and ruining the historical accuracy of the game.
Strategic Ramming Tips
That said… When a ship rams another, the ship struck is pushed Yard Arm’s distance away from the rammer. So, ramming as a game mechanic does have its uses on rare occasions.
- Consider ramming if the goal is to “bump” an enemy into another ship or terrain piece that would result in the ship taking additional damage or running aground.
- It’s an extremely rare occasion, but you can ram your own ships to bump them away from Rocks and islands to avoid running aground. (I once used it to avoid the inevitable collision on the round following the negative effects of a Confused Captain initiative card.)
- Ram in hopes of intentionally getting Entangled. This is useful for potentially denying an opponent its Crew Action as it may prefer to Cut Free to avoid Boarding. If you successfully get Entangled, it allows you to use your Crew Action for something like a Rally.
- Unorthodox tactic. This is an extremely gutsy move, but … on a rare occasions, it is helpful to ram your own ship. You can attempt to bump it closer to the enemy or put it in a better position for a Broadside. Following a ram, if not Entangled, the target is moved a Yard Arm distance away from the rammer. That short distance can push you into a closer range band or firing arc. If this fails though, you will Entangle two of your own ships and cost precious Crew Actions to Cut Free so keep those Fortune Tokens handy!
- Avoid keeping your formations too tight so your own ships aren’t stuck in a situation where they unintentionally collide. If one of the lead ships suddenly becomes crippled or suffers a negative effect, you don’t want your ships following it to pile up and ram each other.
Speed Effects Ramming
- Use your Seasmanship Action to Adjust Speed.
- If you are ramming and have no damage and REALLY want to be Entangled go at the highest sail speed possible. More speed means more dice. More dice means more chances to get Entangled.
- If you are ramming for finesse (e.g. nudging ships into positions) move as slow as possible as the shifting move always happens and you want to avoid damage to your own ship.
- It’s ugly and a bit dirty, but… there is a loophole where you can technically use Sweeps to ram twice in a single round. You take your normal move, resolve the collision–nudging the target forward–then use your Crew Action to Row and cause a second collision to nudge the target forward Yard Arm distance again (if you don’t get Entangled). This does run the risk of damaging your ship twice.